Saturday, May 7, 2016

Ideal Gas Law

The last lesson we learned the first week of the Gas Law unit was the Ideal Gas Law, which revolves around the Kinetic Theory of Gases. In this law...

  1. "Gases consist of small particles (molecules) which are in continuous motion
  2. "The volume of the molecules present is negligible compared to the total volume occupied by the gas"
  3. "Intermolecular forces are negligible"
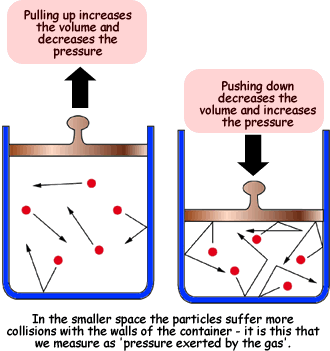
  4. "Pressure is due to the gas molecules colliding with the walls of the container"
Real gases are different from ideal gases because there is less kinetic energy in real gases at low temperatures. So, they are able to attract each other at high pressures because they are closer together so that the volume of the gas molecules becomes significant compared to the volume the gas occupies. 

Below is the formula used for the Ideal Gas Law:

http://dl.clackamas.edu/ch105/lesson1ideal_gas_law.html


P=pressure, V=volume, n=moles, R= gas constant, T= temperature. The gas constant in 0.0821 L atm/ mol K

Here is a link that explains ideal gases more:
Ideal Gas Law

Avogadro's Law and Combined Gas Law

On Wednesday, we learned our third and fourth gas law. Avogadro's law states that volume is directly proportional to the number of moles of gas present as long as there is constant temperature and pressure. So, as the number of moles in a gas increase, the volume will have to increase to maintain that constant pressure and temperature. Here is a picture that represents that concept:

http://wps.prenhall.com/wps/media/objects/4678/4790892/ch09_02.htm
As you can see, the moles and volume doubled to keep the pressure at 1 atm in both cases.

Below is the formula we use in math problems that involve Avogadro's law:

http://me-mechanicalengineering.com/gas-laws/

A helpful fact that comes in handy with some math questions is that the volume of one mole of gas is 22.4 liters. This can be used as a conversion factor.

We also learned about the combined gas law that involves a change in all variables, like moles, volume, temperature, and pressure. It combines all of the gas laws we have learned so far. Here is the formula for it:

http://me-mechanicalengineering.com/gas-laws/

Here are also a couple links that further explain these two laws:


Tuesday, May 3, 2016

Charles' Law

The second law we learned in our gas laws unit was Charles' Law. In his law, he tells us that temperature and volume vary directly with each other. If the temperature increases in a gas, the volume will have to increase in order to keep the pressure constant because of the energized molecules. Here is a chart that exemplifies this:

http://agaul01.blogspot.com/2014/04/boyles-charles-law-in-relation-to.html

Here is his formula too. It is easy to plug in the information you get from a problem, but you have to make sure that you convert Celsius to Kelvin if the problem gives you a temperature in Celsius. :

https://www.clippard.com/cms/wiki/charless-law


Below are a couple links that explain Charles' law more and provide some practice math questions:

Chemteam

Practice Problems


Monday, May 2, 2016

First Lesson

Today in Chemistry, we learned our first Gas Laws Lesson. We focused on Boyle's Law, which only manipulates volume and pressure. It is an inverse relationship, and holds true at a constant temperature. Below is the formula:

http://www.physbot.co.uk/gas-laws.html

To represent its inverse relationship, take the picture below into account:

http://www.cyberphysics.co.uk/topics/kinetic_theory/boyle.htm
As you can see, as the volume decreases, the pressure increases, representing its inverse relationship.

Here are some more links that elaborate on Boyle's Gas Rule:


Saturday, April 23, 2016

2nd Lesson Practice

While studying for the unit test,  I found these links helpful, further explaining and offering practice on intermolecular and intramolecular forces and phase diagrams. I hope you find these helpful!

Phase Diagrams Quiz

Intermolecular and Intramolecular Force Practice

Phase Diagrams

Intermolecular and Intramolecular Forces


http://www.kentchemistry.com/links/Matter/Phasediagram.htm

Tuesday, April 19, 2016

Lab

Yesterday in class, we performed the Specific Heat Capacity of a Metal Lab. In this experiment, we had to place hotter pieces of copper at a certain temperature into a cup of cooler water at a certain temperature to find the heat capacity of the copper. To find the heat capacity, we plugged in all the data from the lab into the equation -MCAT=MCAT. Here are some pictures from the lab:

Here are also some links to practice similar equations:
KentChem
CBHS
Problem Solving With Heat


Monday, April 18, 2016

First Lesson

      Once we finished our Biodiesel projects, we began our next unit: Energy and Phase Diagrams. On Friday, we learned about energy changes and how they are due to the rearrangement of chemical bonds. Most people believe that energy is stored in chemical bonds. However, the "addition of energy is always a requirement for the breaking of bonds, but the breaking if bonds in itself, does not release energy. " "Whether or not an overall reaction releases or requires energy depends upon the final balance between the breaking and forming of chemical bonds." That's where we came to endothermic and exothermic reactions. In an endothermic reaction, energy is gained from the surroundings of the reaction. In an exothermic reaction, energy is lost to the reactions surroundings. Here are diagrams that displays this concept:

https://www.premedhq.com/endothermic-and-exothermic-reactions

http://pindex.com/b/ks3chemistry/energetics
In addition, we learned about calculating heat. To find heat or any of the other components in the equation, use the formula MCAT (M= mass, C= specific heat, AT=delta/temperature=change in temp)

http://www.wikihow.com/Calculate-Specific-Heat

Here are some other helpful links that further explain what we learned in the lesson:

Tuesday, April 5, 2016

Finished Biodiesel Video

Go check out our biodiesel video on YouTube!

In addition, for the next project, we are making a boat that will be fueled with the biodiesel we make in class. Here are a couple links to helpful websites that explain how a small boat should be made!

Homemade Steam Boat

Recycled Materials

http://sci-toys.com/scitoys/scitoys/thermo/thermo.html

Saturday, April 2, 2016

Biodiesel

Here are a couple links to some fun facts about biodiesel that you might find helpful in your video!

allaboutbiofuels

biofuel facts

I also found a couple pictures that taught me interesting information about biodiesel:

http://jamieschemistryfinal.weebly.com/some-extra-fun-biodiesel.html
https://www.pinterest.com/pin/407786941229537185/


Wednesday, March 30, 2016

Biodiesel Links

Yesterday we began researching biodiesel for a competitive video. After reading, I found that it is much cleaner and healthier for the environment compared to petroleum diesel. In addition, it can improve the economy by providing jobs and making America more dependent on itself. Here are links with additional information:

Biodiesel Benefits 

Other Biodiesel Benefits

Biodiesel

http://www.alternative-energy-news.info/technology/biofuels/biodiesel-fuel/

http://butane.chem.uiuc.edu/pshapley/GenChem2/B11/3.html

Tuesday, March 15, 2016

Helpful Study Links

While studying for the chemistry test tomorrow, I found these videos most clear in explaining all the concepts I found most difficult to understand in the chapter. I hope you  find these helpful!

Formal Charges: Calculating Formal Charge
Drawing 3 D Structures 
Dipole Moment
Formal Charge and Dot Structures 

Monday, March 14, 2016

Bond Polarity and different bonds

In our last lesson over the unit, we learned about polarity and different types of bonds. With polarity, electrons are not always shared equally between two atoms. It is often the case where one atom may exert more force on the electron cloud than the other. The polarity of an atom is determined by the difference in electronegativity between the atoms. A coavlent bond is nonpolar if the difference between the two is only a 0.2-0.5 difference. A covalent bond in polar if the difference is ~0.5-1.6. All other bonds with a difference higher than 1.6  are most likely ionic. Covalent bonds regularly occur between two nonmetals and sometimes a nonmetal and a meatalloid. An ionic bond in normally between a metal and a nonmetal. Here is an image that displays this concept.

http://2012books.lardbucket.org/books/principles-of-general-chemistry-v1.0/s12-09-polar-covalent-bonds.html

Also, here are some links that further explain the topic:

Wednesday, March 9, 2016

Shape of Molecules

In class today, we learned about resonance and molecular shape. To have resonance, a compound must have multiple bonds and when you move a bond, the atom you move it to must be able to take the bond. Resonance equalizes bond length and bond strength. Below is an image exemplifying this concept:

http://www.chem.ucla.edu/harding/tutorials/resonance/draw_res_str.html

Next, discussed the shapes of molecules. The valence shell electron pair repulsion theory is used to predict molecular shape. Something to remember is that shape determines function. So, in this concept, the way the molecules arrange themselves in a space depends on the number of lone pairs and bonded entities present.

There are 5 shapes that we are focusing on. First, a tetrahedral molecule has 4 bonded entities around one central atom. A triagnol pyramidal molecule has three bonded entities and one lone pair of electrons on the central atom. Next, a bent molecule has two bonded entities with two lone pairs of electrons on the central atom. A linear molecule has two bonded entities to the central atom that does not have a lone pair. Lastly, a triagnol planar molecule has three bonded entities to the central atom and the central atom does no have any lone pairs. Here is a picture that shows a few of these:

http://cnx.org/contents/d5d1d182-3eb0-419a-bfda-3615e56fafea@1

Here are a couple helpful links that further explain these new ideas:

Molecular Geometry
Resonance

Tuesday, March 8, 2016

First Lesson

Today in class, we learned our first lesson in our new unit: Chemical Bonding. We first discussed the Lewis Dot Concept to illustrate chemical bonding. In one of these diagrams, you simply place electrons around the element symbol, making sure to fill each side of electrons first before pairing them up. Here is a chart that shows how this is done with different elements:


http://edtech2.boisestate.edu/lindabennett1/502/Compounds%20and%20Naming/Lewis%20Dot.html
The octet rule technically determines how many electrons are to be placed in the valence shell. An atom can not have more that 8 electrons total in their outer shell. However, there are exceptions. Hydrogen and Helium only have up to two valence electrons, boron requires 6 electrons to be stable, and beryllium only needs 4 electron to be stable. 

Another concept we learned today was how to solve electron dot formulas of molecules with the HAVE NEED SHARE method. Below is an example:


Here are a couple websites to further explain and practice these new concepts:

Tuesday, March 1, 2016

Periodic Trends

In our last lesson of the unit, we learned about periodic trends. There are 4 trends that mainly focus on the S and P blocks on the periodic table. First, we learned about atomic size. As you move across a period from left to right, atomic size decreases because there is an increase in protons. Since the protons increasingly attract the electrons, the electrons pull toward the protons more and more, making the size smaller as you go to the right. Here is a chart that displays this trend:

https://www.boundless.com/chemistry/textbooks/boundless-chemistry-textbook/nonmetallic-elements-21/properties-of-nonmetals-147/atomic-size-569-7507/
Next, we discussed ionization energy. Ionization energy is the energy needed to remove an electron from a gaseous state. As you move up and to the right of the periodic table, the ionization energy increases. Here is a chart that displays this concept;

https://en.wikibooks.org/wiki/High_School_Chemistry/Ionization_Energy

Then, we learned about trends in electron affinity, which is how easy it is to add another electron to an atom. Electron affinity also increases as you move up and to the right of the periodic table. Here is a chart the exemplifies the trend:

https://en.wikibooks.org/wiki/High_School_Chemistry/Electron_Affinity

Lastly, we discussed trends in electronegativity, which is the tendency of an atom to draw electrons toward itself when chemically combined with another element. Elements with larger electronegativity tend to pull electrons to themselves when bonded to other elements. It increases as you go up and to the right of the periodic table too. Here is a chart that displays this trend:

http://chemteacher.chemeddl.org/services/chemteacher/index.php?option=com_content&view=article&id=91

Here are a couple links that further explain some of these trends:

Monday, February 29, 2016

Quantum Numbers

Last week, our chemistry class learned about quantum numbers. In the lecture, we were told that every atom is assigned a set of four quantum numbers. The first number is the principle quantum number. This number corresponds to the atom's principle energy level. The second number is the angular momentum quantum number. This digit represents the atom's final sublevel. The numbers are s=0,p=1,d=2,and f=3. Next, the third quantum number is the magnetic quantum number, which is determined on the last valence electron's placing on its orbital. This number can range from -3 to +3 when in a f sublevel. Finally, the last quantum number is the spin quantum number, which can either be -1/2 or +1/2. This is determined by knowing which direction the last valence electron in an atom faces (up or down on a chart). Below are examples:

http://chemwiki.ucdavis.edu/Core/Physical_Chemistry/Quantum_Mechanics/10%3A_Multi-electron_Atoms/Quantum_Numbers

Here are a couple links to help:

Wednesday, February 24, 2016

Tuesday, February 23, 2016

Lab

Today in class, my partner and I conducted a lab using a spectrophotometer. To zero out the the machine, we used water in a cuvette and adjusted knobs to zero and one hundred percent transmittance. Then, we placed one of our solutions, Cr(NO3)3, also in a cuvette, in the machine to measure its percent transmittance and absorbance. Next, we placed the CoCl2 in a cuvette in the machine and measured its transmittance and absorbance. We repeated this entire process multiple times, changing the wavelengths each time. Here are some pictures from the lab below.


Thursday, February 18, 2016

Flame Test

Today in class, we conducted the flame test. After passing a pre-lab that reviewed the lesson from yesterday, my partner and I went to the lab to start our experiment. We had various solutions and crystals, all of different metals. We took a wooden stick that soaked in the solutions and put it into a flame to see what color is produced. We also put crystals in the flame to see what color they made. With the color, we will be able to look at the light spectrum to find the metals wavelength. With this information, we will eventually be able to calculate the energy of one mole of photons for each various metal. Here are some pictures from the lab below:


Wednesday, February 17, 2016

New Unit

Today in class we learned the first lesson of our new unit, electronic structure. We discussed the wave nature of light and how every object has a wave nature. In addition, all waves have a characteristic wave length. Below is a picture of the different parts of a wavelength:

http://dev.physicslab.org/document.aspx?doctype=3&filename=wavessound_introductionwaves.xml

The longer the wavelength, the shorter the amplitude and the lower the energy. 

Next, we learned the formula for velocity. Here it is below, showing what each symbol means and the unit that corresponds with each:


http://accessiblemediacenter.techadapt.com/samples/CAST_Exemplars/Exemplar6/content/bodymatter-level2-121.htm

C, which is a constant (speed of light= 3.0x10^3) often replaces v in the formula. With at least two parts of the formula, we can solve for any of the pieces of the formula.

Here are a couple links that are helpful:
basic chemistry for mad scientist

Tuesday, February 9, 2016

Percent Acetic Acid in Vinegar

For the last few days, my lab partner and I have been carrying out the percent acetic acid and vinegar lab, where we titrate acids in order to ultimately find the percent of acetic acid in commercial vinegar. First, we mixed about .5 grams of hydrogen phthalate into water to dilute it. Then, we added an indicator and titrated it with sodium hydroxide until the solution turned pink. When the solution turned pink, we knew that all of the KHP had been reacted with since the NaOH will react with the acid before the indicator. Next, we titrated diluted vinegar with the NaOH until it turned pink too (from the indicator). Since we recorded the amount of solutions used, we can calculate the molarity of the NaOH and find the molarity of the vinegar used. This information will eventually lead us into finding the vinegar's % of acetic acid in it. Here are some pictures from the lab:


Saturday, February 6, 2016

Last Lesson

The last lesson that we learned about in the Acids and Bases unit involved stoichoimetry. Most questions asked to find the volume, pH, or concentration of a solution and gave about three pieces of information. For a couple of them, we had to find the limiting reagent. Here is a link to practice these types of question:

Chemteam


We also briefly discussed pH titration curves. Here is a picture comparing the titration curves of a strong acid and base:

http://chemistry.tutorvista.com/inorganic-chemistry/calculating-molarity.html

Wednesday, February 3, 2016

ICE Problems

To complete all of the questions from this lesson, we used the flow chart below.


http://www.sciencegeek.net/Chemistry/taters/Unit8pH.htm
In the chart, the OH- is the hydroxide ions and the H+ is the hydronium ions in a solution. By knowing one of the components on the chart, you can solve the pH, pOH, or the ions of the acids and bases in that particular solution.

An example of a problem that would utilize this chart looks like this. The question regularly involves finding the equilibrium:

http://pinl.net/vs/ice-tables-for-equilibrium.xhtml


In this problem, the I stands for INITIAL, which is the original information you are given. The C stand for CHANGE, which is +x, -x, -x most of the time across. Lastly the E is for EQUILIBRIUM. Once you place all of the components in the chart, you add them down. Next, you take those components and put them in the expression on the right, placing the products over the reactants in the solution (not including water) and equal that to the constant. Then, you distrubute the the costant to the fraction to come up with a quadratic formula. Next, with the formula, you place the parts of the formula to form a quadratic equation to find x. After you solve for x, you have the ion concentrations of either the acid or base you were looking for. Finally, if you wanted to find the pH or the pOH of the solution, you place the concentration in the antilog.

Here is a link to practice these types of questions and further explanations:
Explanation
Practice

Monday, February 1, 2016

The Strength of Acids and Bases

On Thursday last week, we learned how to tell if an acid and base reaction forms an acidic, basic, or neutral salt. In addition, we discovered how tell if a solution is acidic,basic, or neutral.

First, we discussed salts. Below is a chart that shows how to know if the salt formed is acidic, basic, or neutral. As long as you know if the acid and base mixed in the reaction is strong or weak, you can determine the property of the salt.

http://slideplayer.com/slide/2406970/
Next, we learned about the concentrations of hydroxide and hydronium ions in solutions. To find the concentrations, we manipulate the formula below to solve for the component that we want.
Image result for kw formula chemistry
http://study.com/academy/lesson/the-ph-scale-calculating-the-ph-or-poh-of-a-solution.html

You are usually given one of the concentrations and know that kw= 1.0 x 10^-14. So with those two pieces of information, you can find the solution's other concentration.

Here are a couple links that you can practice with and quiz yourself on with answers:
Predicting Salt pH
Calculating H-OH Ion Concentrations


Wednesday, January 27, 2016

1st lesson

Today in class, we had our first lesson on our new unit: Acids and Bases. We first learned about the physical properties of acids and bases:

http://chemwiki.ucdavis.edu/Textbook_Maps/General_Chemistry_Textbook_Maps/Map%3A_Chemistry%3A_The_Central_
Science_(Brown_et_al.)/04._Reactions_in_Aqueous_Solution/4.3%3A_Acid-Base_Reactions

In addition to the picture above, acids feel sticky to the touch, like syrup.

Next, we discussed Arrhenius acids and bases. Arrhenius acids are acids that produce hydrogen ions in a solution. Arrhenius bases are bases that produce hydroxide ions in a solution. So, when put in a solution, the compound that they are a part of breaks apart and either increases the hydrogen or hydroxide concentration in the solution, depending on what is dissolved.

According to the pH scale, the lower the pH, the higher the hydrogen ion concentration in the solution. On the other hand, the higher the pH, the higher the hydroxide ion concentration.

We also learned about Bronsted- Lowery acids and bases. According to this definition, acids donate a proton and bases accept a proton. In B.L. definitions, we also have conjugate acids and bases. Acids produce conjugate bases and bases produce conjugate acids. You can see this in the picture below:


Here are a couple links to practice the new concepts we learned:
acid base quiz
acid and base quiz

Monday, January 25, 2016

Vitamin C Lab Day 1

     Today in class, my lab partner and I did part of the vitamin c lab. First, while waiting for the vitamin c lab standard solution to be made by another lab group, we filled up our different pipets with apple juice, pear juice, V8 juice, white grape juice, starch, and iodine. We made sure to keep the iodine dark and covered in tin foil to prevent it from decomposing. While performing the lab, on one round, we took 20 drops of the vitamin c standard solution and added three drops of starch to that. Then, we added drops of iodine, making sure to count all the drops, until the solution changed from clear to a dark blue. The dark blue color indicated the end of the reaction between the vitamin c and the iodine. We repeated this a few more times, switching out the vitamin c solution with the different juices. Here are some pictures from the lab:


Here is also a helpful website about our new unit:
Acid Base Link